×


一、实验原理
简单串口通信实例
1、串口设置的一般步骤可以总结为如下几个步骤:
1) 串口时钟使能,GPIO时钟使能
2) 串口复位
3) GPIO端口模式设置
4) 串口参数初始化
5) 开启中断并且初始化NVIC(如果需要开启中断才需要这个步骤)
6) 使能串口
7) 编写中断处理函数
2、具体函数实现
1)串口时钟使能,GPIO时钟使能:RCC_APB2PeriphClockCmd();
//①串口时钟使能,GPIO时钟使能
RCC_APB2PeriphClockCmd(RCC_APB2Periph_GPIOA,ENABLE);//GPIOA时钟使能
RCC_APB2PeriphClockCmd(RCC_APB2Periph_USART1,ENABLE);//串口1时钟使能
2)GPIO端口模式设置:GPIO_Init(); 模式设置为GPIO_Mode_AF_PP和GPIO_Mode_IN_FLOATING
//②TX
GPIO_InitStrue.GPIO_Mode=GPIO_Mode_AF_PP;//查中文手册,串口需要配置的模式
GPIO_InitStrue.GPIO_Pin=GPIO_Pin_9;
GPIO_InitStrue.GPIO_Speed=GPIO_Speed_10MHz;
GPIO_Init(GPIOA,&GPIO_InitStrue);//GPIO端口模式设置
//②RX
GPIO_InitStrue.GPIO_Mode=GPIO_Mode_IN_FLOATING;
GPIO_InitStrue.GPIO_Pin=GPIO_Pin_10;
GPIO_InitStrue.GPIO_Speed=GPIO_Speed_10MHz;
GPIO_Init(GPIOA,&GPIO_InitStrue);//GPIO端口模式设置
3)串口参数初始化:USART_Init();
//③串口参数初始化
USART_InitStrue.USART_BaudRate=115200;//波特率
USART_InitStrue.USART_HardwareFlowControl=USART_HardwareFlowControl_None;//无硬件流
USART_InitStrue.USART_Mode=USART_Mode_Tx|USART_Mode_Rx;//收发模式都打开
USART_InitStrue.USART_Parity=USART_Parity_No;//无奇偶校验
USART_InitStrue.USART_StopBits=USART_StopBits_1;//停止位
USART_InitStrue.USART_WordLength=USART_WordLength_8b;//字长8
USART_Init(USART1,&USART_InitStrue);
4)开启中断并且初始化NVIC(如果需要开启中断才需要这个步骤)
NVIC_Init();
USART_ITConfig();
//④
USART_ITConfig(USART1,USART_IT_RXNE,ENABLE);//④开启接收中断!!!!
NVIC_InitStrue.NVIC_IRQChannel=USART1_IRQn;;//串口1中断
NVIC_InitStrue.NVIC_IRQChannelCmd=ENABLE;
NVIC_InitStrue.NVIC_IRQChannelPreemptionPriority=1;// 抢占优先级为1
NVIC_InitStrue.NVIC_IRQChannelSubPriority=1;//子优先级位1
NVIC_Init(&NVIC_InitStrue);//④中断初始化函数
5)使能串口:USART_Cmd();
//⑤使能串口
USART_Cmd(USART1,ENABLE);
6)编写中断处理函数:USARTx_IRQHandler();
7)串口数据收发:
void USART_SendData();//发送数据到串口,DR
uint16_t USART_ReceiveData();//接受数据,从DR读取接受到的数据
//自己编写的中断处理函数(SYSTEM中重复定义了)⑥
void USART1_IRQHandler(void)
{
u8 res;
if(USART_GetITStatus(USART1,USART_IT_RXNE))//判断是否有接受中断!
{
//串口数据收发函数⑦
res= USART_ReceiveData(USART1);
USART_SendData(USART1,res);
}
}
8)串口传输状态获取(暂未用到):
FlagStatus USART_GetFlagStatus(USART_TypeDef* USARTx, uint16_t USART_FLAG);
void USART_ClearITPendingBit(USART_TypeDef* USARTx, uint16_t USART_IT);
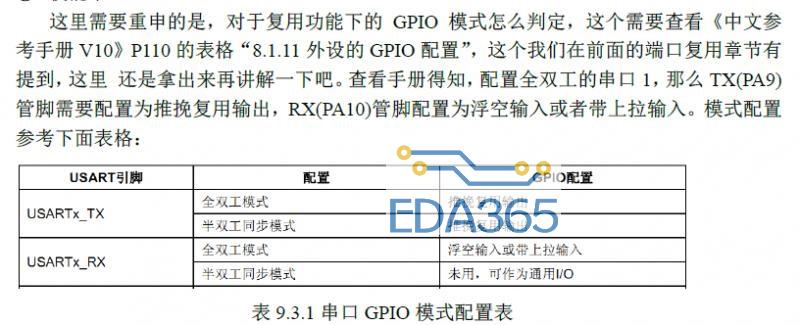
3、使用中文手册查串口需要配置的GPIO模式
二、实验代码
**main.c**
#include "stm32f10x.h"
void My_USART1_Init(void)//自己写的简单串口初始化函数,可以把单独个uart.c
{
//2、3、4定义结构体指针
GPIO_InitTypeDef GPIO_InitStrue;
USART_InitTypeDef USART_InitStrue;
NVIC_InitTypeDef NVIC_InitStrue;
//①串口时钟使能,GPIO时钟使能
RCC_APB2PeriphClockCmd(RCC_APB2Periph_GPIOA,ENABLE);//GPIOA时钟使能
RCC_APB2PeriphClockCmd(RCC_APB2Periph_USART1,ENABLE);//串口1时钟使能
//②TX
GPIO_InitStrue.GPIO_Mode=GPIO_Mode_AF_PP;//查中文手册,串口需要配置的模式
GPIO_InitStrue.GPIO_Pin=GPIO_Pin_9;
GPIO_InitStrue.GPIO_Speed=GPIO_Speed_10MHz;
GPIO_Init(GPIOA,&GPIO_InitStrue);//GPIO端口模式设置
//②RX
GPIO_InitStrue.GPIO_Mode=GPIO_Mode_IN_FLOATING;
GPIO_InitStrue.GPIO_Pin=GPIO_Pin_10;
GPIO_InitStrue.GPIO_Speed=GPIO_Speed_10MHz;
GPIO_Init(GPIOA,&GPIO_InitStrue);//GPIO端口模式设置
//③串口参数初始化
USART_InitStrue.USART_BaudRate=115200;//波特率
USART_InitStrue.USART_HardwareFlowControl=USART_HardwareFlowControl_None;//无硬件流
USART_InitStrue.USART_Mode=USART_Mode_Tx|USART_Mode_Rx;//收发模式都打开
USART_InitStrue.USART_Parity=USART_Parity_No;//无奇偶校验
USART_InitStrue.USART_StopBits=USART_StopBits_1;//停止位
USART_InitStrue.USART_WordLength=USART_WordLength_8b;//字长8
USART_Init(USART1,&USART_InitStrue);
//⑤使能串口
USART_Cmd(USART1,ENABLE);
//④
USART_ITConfig(USART1,USART_IT_RXNE,ENABLE);//④开启接收中断!!!!
NVIC_InitStrue.NVIC_IRQChannel=USART1_IRQn;;//串口1中断
NVIC_InitStrue.NVIC_IRQChannelCmd=ENABLE;
NVIC_InitStrue.NVIC_IRQChannelPreemptionPriority=1;// 抢占优先级为1
NVIC_InitStrue.NVIC_IRQChannelSubPriority=1;//子优先级位1
NVIC_Init(&NVIC_InitStrue);//④中断初始化函数
}
//自己编写的中断处理函数(SYSTEM中重复定义了)⑥
void USART1_IRQHandler(void)
{
u8 res;
if(USART_GetITStatus(USART1,USART_IT_RXNE))//判断是否有接受中断!
{
//串口数据收发函数⑦
res= USART_ReceiveData(USART1);
USART_SendData(USART1,res);
}
}
int main(void)
{
NVIC_PriorityGroupConfig(NVIC_PriorityGroup_2);//中断优先级分组函数
My_USART1_Init();
while(1);//等待中断
}
三、实验结果

需要串口助手中的配置与初始化的一致
//串口参数初始化
USART_InitStrue.USART_BaudRate=115200;//波特率
USART_InitStrue.USART_HardwareFlowControl=USART_HardwareFlowControl_None;//无硬件流
USART_InitStrue.USART_Mode=USART_Mode_Tx|USART_Mode_Rx;//收发模式都打开
USART_InitStrue.USART_Parity=USART_Parity_No;//无奇偶校验
USART_InitStrue.USART_StopBits=USART_StopBits_1;//停止位
USART_InitStrue.USART_WordLength=USART_WordLength_8b;//字长8
USART_Init(USART1,&USART_InitStrue);
『本文转载自网络,版权归原作者所有,如有侵权请联系删除』


 热门文章
更多
热门文章
更多

 STM32中断向量表的位置.重定向


 APP下载
APP下载 登录
登录


