
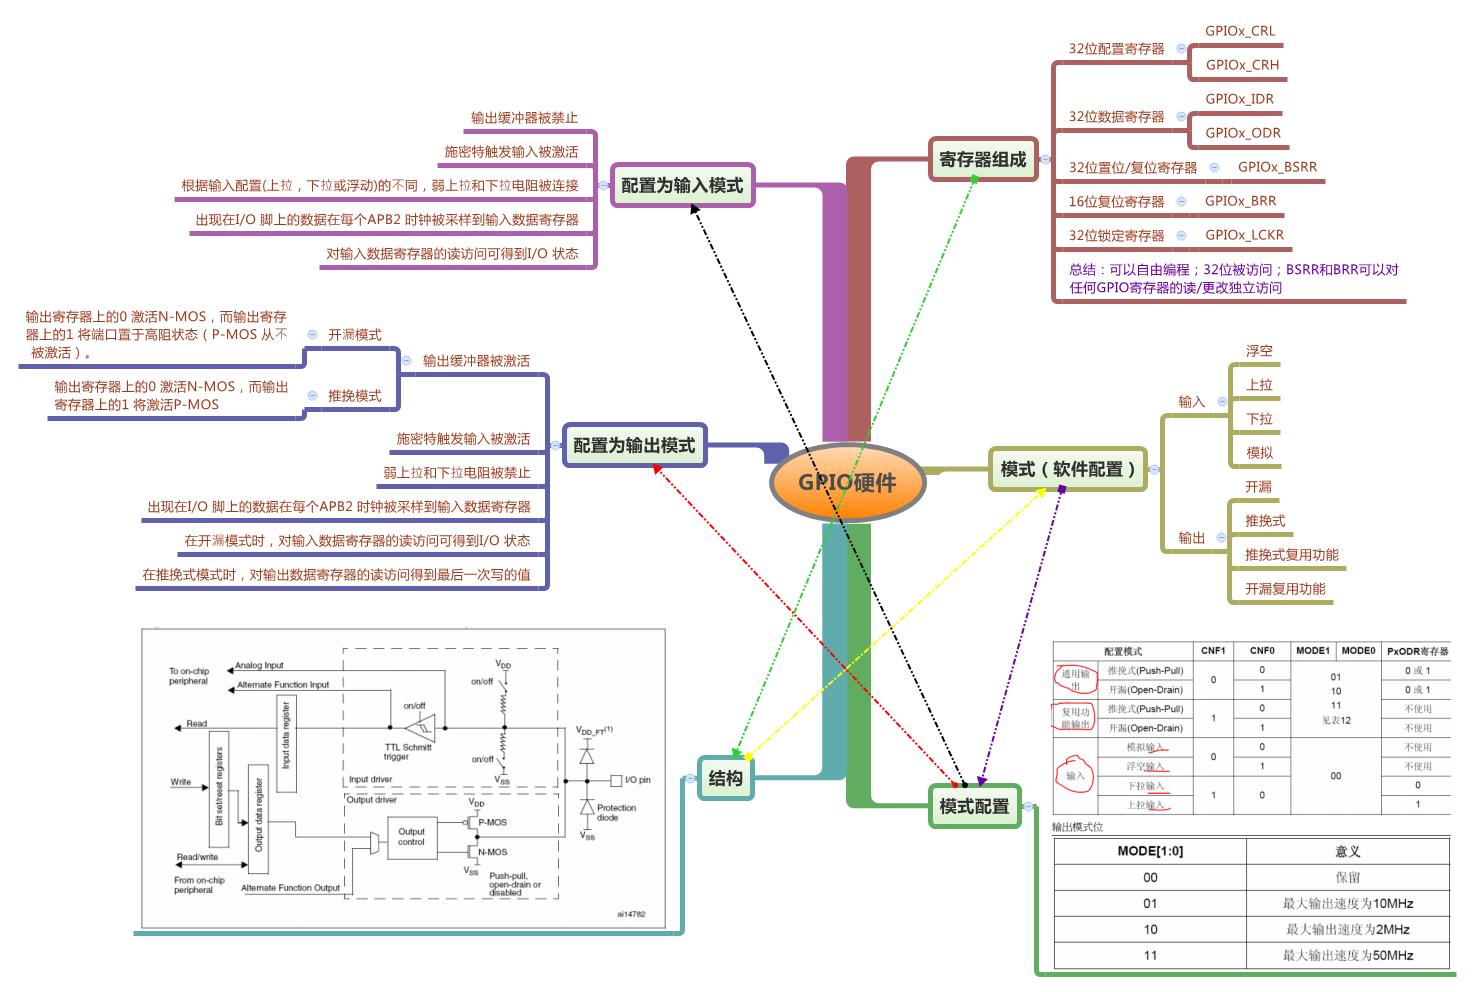
1、GPIO硬件结构图:
2、GPIO程序结构:

3、框架介绍:
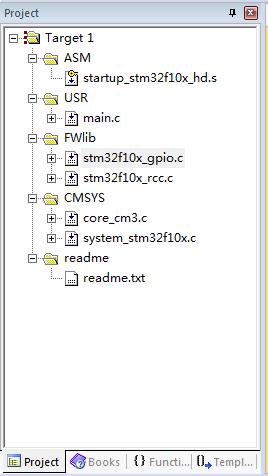
|
4、代码片段解析:
4.1 引入函数
#include "stm32f10x.h"
这个是用户文件中唯一要包含和修改的库函数!除此之外我们还要把文件stm32f10x_conf.h做相应修改:(如第二行注释所示就是使能你FWlib中引入的文件,这个非常重要,一定不要少了)
1 /* Includes ------------------------------------------------------------------*/
2 /* Uncomment the line below to enable peripheral header file inclusion */
3 /* #include "stm32f10x_adc.h" */
4 /* #include "stm32f10x_bkp.h" */
5 /* #include "stm32f10x_can.h" */
6 /* #include "stm32f10x_crc.h" */
7 /* #include "stm32f10x_dac.h" */
8 /* #include "stm32f10x_dbgmcu.h" */
9 /* #include "stm32f10x_dma.h" */
10 /* #include "stm32f10x_exti.h" */
11 /* #include "stm32f10x_flash.h" */
12 /* #include "stm32f10x_fsmc.h" */
13 #include "stm32f10x_gpio.h"
14 /* #include "stm32f10x_i2c.h" */
15 /* #include "stm32f10x_iwdg.h" */
16 /* #include "stm32f10x_pwr.h" */
17 #include "stm32f10x_rcc.h"
18 /* #include "stm32f10x_rtc.h" */
19 /* #include "stm32f10x_sdio.h" */
20 /* #include "stm32f10x_spi.h" */
21 /* #include "stm32f10x_tim.h" */
22 /* #include "stm32f10x_usart.h" */
23 /* #include "stm32f10x_wwdg.h" */
24 /* #include "misc.h" */ /* High level functions for NVIC and SysTick (add-on to CMSIS functions) */
4.2 端口宏定义
1 #define LED1_ON GPIO_SetBits(GPIOB, GPIO_Pin_8);
2 #define LED1_OFF GPIO_ResetBits(GPIOB, GPIO_Pin_8);
3
4 #define LED2_ON GPIO_SetBits(GPIOD, GPIO_Pin_6);
5 #define LED2_OFF GPIO_ResetBits(GPIOD, GPIO_Pin_6);
6
7 #define LED3_ON GPIO_SetBits(GPIOD, GPIO_Pin_3);
8 #define LED3_OFF GPIO_ResetBits(GPIOD, GPIO_Pin_3);
这里就是宏定义PB8、PD6、PD3三个端口输出高低电平,这样在这3个端口接上LED就能通过给高低电平控制灯的亮灭。
4.3 系统时钟使能函数
1 void RCC_Configuration(void)
2 {
3 SystemInit();
4 }
这里函数是RCC初始化,这里只调用库函数初始化了系统时钟72Mhz
4.4 GPIO初始化函数
1 void LED_Config(void){
2 GPIO_InitTypeDef GPIO_InitStructure;
3
4 RCC_APB2PeriphClockCmd(RCC_APB2Periph_GPIOB | RCC_APB2Periph_GPIOD , ENABLE);
5 GPIO_InitStructure.GPIO_Pin = GPIO_Pin_8; //LED1 V6 //将V6,V7,V8 配置为通用推挽输出
6 GPIO_InitStructure.GPIO_Mode = GPIO_Mode_Out_PP;
7 GPIO_InitStructure.GPIO_Speed = GPIO_Speed_50MHz; //口线翻转速度为50MHz
8 GPIO_Init(GPIOB, &GPIO_InitStructure);
9
10 GPIO_InitStructure.GPIO_Pin = GPIO_Pin_6|GPIO_Pin_3; //LED2, LED3 V7 V8
11 GPIO_Init(GPIOD, &GPIO_InitStructure);
12 }
这里是GPIO的初始化函数,第二行是定义一个GPIO初始化结构体,第四行是使能GPIOB和GPIOD的时钟,第5-7行是对GPIO初始化结构体信息的填充,要根据所需GPIO的不同属性进行设置,第8行是调用库函数GPIO_Init()对GPIOB8进行初始化,采用结构体的信息,同样的道理,来初始化GPIOD6和D3.
4.5 简单延时函数
1 void Delay(__IO uint32_t nCount)
2 {
3 for(; nCount != 0; nCount--);
4 }
4.6 主程序
1 int main(void)
2 {
3 RCC_Configuration(); //系统时钟配置
4 LED_Config(); //LED控制配置
5 while (1)
6 {
7 LED1_ON; LED2_OFF; LED3_OFF; //LED1亮 LED2,LED3灭(LED2,LED3 仅V3,V2,V2.1板有)
8 Delay(0xAFFFF);
9 LED1_OFF; LED2_ON; LED3_OFF; //LED2亮 LED1,LED3灭(LED2,LED3 仅V3,V2,V2.1板有)
10 Delay(0xAFFFF);
11 LED1_OFF; LED2_OFF; LED3_ON; //LED3亮 LED1,LED2灭(LED2,LED3 仅V3,V2,V2.1板有)
12 Delay(0xAFFFF);
13 }
14 }
『本文转载自网络,版权归原作者所有,如有侵权请联系删除』


 热门文章
更多
热门文章
更多

--处理器的状态,模式以及概括了解内部寄存器") 快速学Arm(9)--处理器的状态,模式以及概括了解内部寄存器
快速学Arm(9)--处理器的状态,模式以及概括了解内部寄存器


 APP下载
APP下载 登录
登录


