×


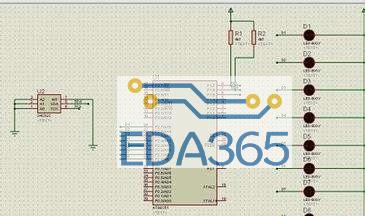
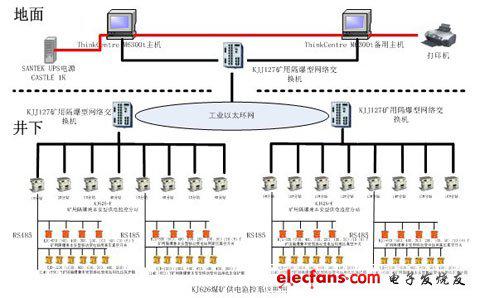
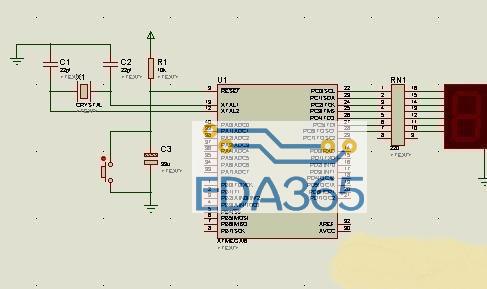
一、硬件连接
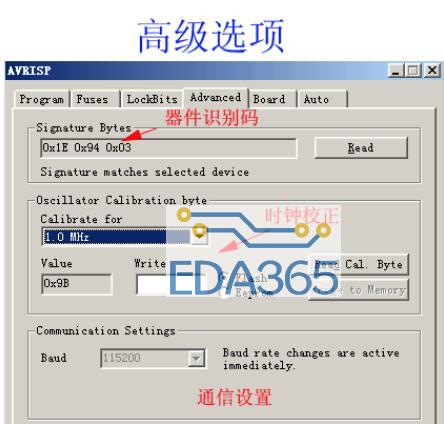
二、串口助手设置:
三、keil下编程
1.要添加的工程文件
二要编写的user文件
1.main.c
#include "printf.h"
int main()
{
printf_init();
printf("luoyiran is a nice boyn");
printf("xixin");
printf("serial communications is so mystical and interesting!n");
printf("keep striving!n");
}
2.printf.c
#include "printf.h"
#include "stm32f10x.h"
#include "stm32f10x_rcc.h"
#include "stm32f10x_gpio.h"
#include "stm32f10x_usart.h"
#include "misc.h"
int fputc(int ch,FILE *f)
{
while(USART_GetFlagStatus(USART2,USART_FLAG_TC) != SET);
USART_SendData(USART2,(unsigned char)ch);
while(USART_GetFlagStatus(USART2,USART_FLAG_TC) != SET);
return (ch);
}
/*函数名printf_init()
描述:配置USART2的GPIO口,
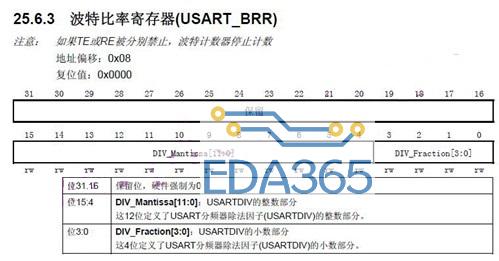
工作模式为:比特率115200 数据位:8位 奇偶校验位:N 停止位:1
输入:无
输出:无
****************************/
void printf_init(void)
{
GPIO_InitTypeDef GPIO_InitStructure;
USART_InitTypeDef USART_InitStructure;
/*config USART clock*/
RCC_APB2PeriphClockCmd(RCC_APB2Periph_GPIOA|RCC_APB2Periph_AFIO,ENABLE);
RCC_APB1PeriphClockCmd( RCC_APB1Periph_USART2,ENABLE);
/*USART1 GPIO config*/
GPIO_InitStructure.GPIO_Pin= GPIO_Pin_2;
GPIO_InitStructure.GPIO_Mode= GPIO_Mode_AF_PP; //复用推挽输出
GPIO_InitStructure.GPIO_Speed = GPIO_Speed_50MHz;
GPIO_Init(GPIOA,&GPIO_InitStructure);
GPIO_InitStructure.GPIO_Pin= GPIO_Pin_3;
GPIO_InitStructure.GPIO_Mode= GPIO_Mode_IN_FLOATING; //复用开漏输入
GPIO_Init(GPIOA,&GPIO_InitStructure);
/*USART1 mode Config*/
USART_InitStructure.USART_BaudRate = 115200;
USART_InitStructure.USART_WordLength = USART_WordLength_8b;
USART_InitStructure.USART_StopBits = USART_StopBits_1;
USART_InitStructure.USART_Parity = USART_Parity_No;
USART_InitStructure.USART_HardwareFlowControl = USART_HardwareFlowControl_None;
USART_InitStructure.USART_Mode = USART_Mode_Rx | USART_Mode_Tx;
USART_Init(USART2,&USART_InitStructure);
USART_Cmd(USART2,ENABLE);
}
printf.h
#ifndef __printf_H
#define __printf_H
#include "stm32f10x.h"
#include
void printf_init(void);
int fputc(int ch,FILE *f);
#endif
四、编译文件,点击load,打开串口调试助手,接上跳线帽子,观察串口助手打印现象
『本文转载自网络,版权归原作者所有,如有侵权请联系删除』


 热门文章
更多
热门文章
更多

 单片机中高阻态的实质及意义


 APP下载
APP下载 登录
登录


