×


最近需要用STM8S105做驱动控制器,涉及到使用485与上位机通讯,上位机的蓝牙模块中使用CC2541。这是个新产品,没有可借鉴的代码,涉及到的协议解算和逻辑结构又比较多,规划了一下架构并尝试写了几行代码,发现在编程幼稚园中学的状态机式编程实在难以胜任,于是打算上一个操作系统。
考虑到ucos代码量比较大,不适用于这种小片子,一时难以抉择。忽然想到已经在BLE上耕耘了大半年了,使用OSAL非常得心应手,于是想把CC2541中的OSAL移植过来。
严格意义上来讲,OSAL不是真正的嵌入式实时操作系统,它的本质是状态机式的伪操作系统,它和Contiki有点像,和uCOS的架构则完全不同(因为uCOS底层是真正要做任务切换的,会把寄存器压入任务栈)。OSAL是把状态机伪装成嵌入式操作系统的接口方式,用起来很方便,每个事件任务处单独处理,并实现了轻量级。而这对于我就够了,因为我只是不想靠脑子去理清那么复杂的下一步、下一步应该到哪,那种感觉我一想起来都觉得不寒而栗。
系统具体原理和使用方法这里就不多讲了,TI官方有OSAL手册。接下来直接切入正题,实现移植。
把OSAL从CC2541工程移植到STM8上需要复制以下这些系统文件:
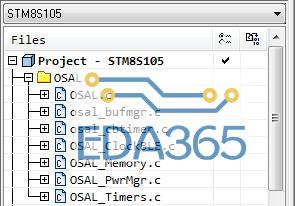
接下来要创建三个文件,如下图,接下来详述:

首先创建是的时钟文件,这里我起名为app_timer.c , 它配置和使用timer4,负责提供系统调度的时基,文件中代码如下:
/**
******************************************************************************
Timer 文件,产生1ms时基
******************************************************************************
*/
/* Includes ------------------------------------------------------------------*/
#include "stm8s.h"
#include "stm8s_eval.h"
#include "app_uart.h"
#include "app_bsp.h"
#include "OSAL_Clock.h"
#define TIM4_PERIOD 124
volatile uint32_t sysTick; /*系统时间计数器*/
void TIM4_TimeBase_Init(void)
{
/* TIM4 configuration:
- TIM4CLK is set to 16 MHz, the TIM4 Prescaler is equal to 128 so the TIM1 counter
clock used is 16 MHz / 128 = 125 000 Hz
- With 125 000 Hz we can generate time base:
max time base is 2.048 ms if TIM4_PERIOD = 255 --> (255 + 1) / 125000 = 2.048 ms
min time base is 0.016 ms if TIM4_PERIOD = 1 --> ( 1 + 1) / 125000 = 0.016 ms
- In this example we need to generate a time base equal to 1 ms
so TIM4_PERIOD = (0.001 * 125000 - 1) = 124 */
sysTick = 0; /*初始化系统时间计数器*/
TIM4_DeInit();
/* Time base configuration */
TIM4_TimeBaseInit(TIM4_PRESCALER_128, TIM4_PERIOD); /*1ms中断*/
/* Clear TIM4 update flag */
TIM4_ClearFlag(TIM4_FLAG_UPDATE);
/* Enable update interrupt */
TIM4_ITConfig(TIM4_IT_UPDATE, ENABLE);
/* enable interrupts */
//enableInterrupts();
/* Enable TIM4 */
TIM4_Cmd(ENABLE);
//TIM4->CR1 |= TIM4_CR1_CEN; /* Enable TIM4 同上,二选一*/
}
void TIM4_TimeBase_Interrupt(void) /*1ms中断*/
{
/* Cleat Interrupt Pending bit */
TIM4_ClearITPendingBit(TIM4_IT_UPDATE);
/*User Hook Function*/
TimerBase_UART_Hook();
/*系统时间*/
sysTick++;
osalTimeUpdate(); /*1ms更新OS时基*/
}
uint32_t getMcuTickCount(void)
{
return sysTick;
}
/******************************End File*****************************/
接下来新建一个app_OSAL.c文件,该文件用于初始化用户任务:
/**************************************************************************************************
* INCLUDES
**************************************************************************************************/
#include "hal_types.h"
#include "OSAL.h"
#include "OSAL_Tasks.h"
#include "app.h"
/* HAL */
#include "hal_drivers.h"
/*********************************************************************
* GLOBAL VARIABLES
*/
// The order in this table must be identical to the task initialization calls below in osalInitTask.
const pTaskEventHandlerFn tasksArr[] =
{
Hal_ProcessEvent, // task 0
App_ProcessEvent // task 1
};
const uint8 tasksCnt = sizeof( tasksArr ) / sizeof( tasksArr[0] );
uint16 *tasksEvents;
/*********************************************************************
* FUNCTIONS
*********************************************************************/
/*********************************************************************
* @fn osalInitTasks
*
* @brief This function invokes the initialization function for each task.
*
* @param void
*
* @return none
*/
void osalInitTasks( void )
{
uint8 taskID = 0;
tasksEvents = (uint16 *)osal_mem_alloc( sizeof( uint16 ) * tasksCnt);
osal_memset( tasksEvents, 0, (sizeof( uint16 ) * tasksCnt));
/* Hal Task */
Hal_Init( taskID++ );
/* Application */
App_Init( taskID );
}
/*********************************************************************
*********************************************************************/
接下来要修改OSAL文件中的OSAL_ClockBLE.c文件,里面osalTimeUpdate这个函数是用于刷新系统驱动时钟的,因为原来它是借助于BLE的时隙时钟为625us,做了比较复杂的换算成1ms,但是因为上面我自己改造了时钟函数,可以产生1ms时基,所以这里注释掉换算代码,直接用自己的时基:
//extern volatile uint32_t sysTick; /*系统时间计数器*/
void osalTimeUpdate( void )
{
// uint32 tmp;
// uint32 ticks1ms;
// uint16 elapsedMSec = 0;
// static uint32 test =0 ;
//
// // Get the free-running count of 625us timer ticks
// //tmp = ll_McuPrecisionCount();
// tmp = getMcuTickCount();
// //tmp = sysTick;
//
// if ( tmp != previousLLTimerTick )
// {
// // Calculate the elapsed ticks of the free-running timer.
// ticks1ms = tmp - previousLLTimerTick;
//
// // Store the LL Timer tick count for the next time through this function.
// previousLLTimerTick = tmp;
//
// /* It is necessary to loop to convert the usecs to msecs in increments so as
// * not to overflow the 16-bit variables.
// */
//// while ( ticks1ms > MAXCALCTICKS )
//// {
//// ticks625us -= MAXCALCTICKS;
//// elapsedMSec += MAXCALCTICKS * 5 / 8;
//// remUsTicks += MAXCALCTICKS * 5 % 8;
//// }
////
//// // update converted number with remaining ticks from loop and the
//// // accumulated remainder from loop
//// tmp = (ticks625us * 5) + remUsTicks;
////
//// // Convert the 625 us ticks into milliseconds and a remainder
//// elapsedMSec += tmp / 8;
//// remUsTicks = tmp % 8;
//
// // Update OSAL Clock and Timers
// elapsedMSec = ticks1ms;
// if ( elapsedMSec )
// {
// osalClockUpdate( elapsedMSec );
// osalTimerUpdate( elapsedMSec );
// }
// }
osalClockUpdate( 1 );
osalTimerUpdate( 1 );
}
最后一步,在main.c文件中增加OSAL相关语句,我工程中的main.c文件内容如下:
void main()
{
/* system_clock / div = 1 */
CLK_HSIPrescalerConfig(CLK_PRESCALER_HSIDIV1);
BSP_Init(&Board_Address);
#if !defined(__DEBUG) && !defined(__DEBUG_MODBUS) && !defined(__DEBUG_UART) && !defined(__DEBUG_I2C)
UART_APP_Init(); /*APP mode*/
#else
UART_Debug_Init(); /*Use debug mode, don't init app uart*/
#endif
/* Output a message on Hyperterminal using printf function */
DEBUG("Start done! Version:%s n",__DATE__);
// I2C_APP_Init();
ModbusInit(Board_Address);
TIM4_TimeBase_Init();
ADC_APP_Init();
/* Initialize the operating system */
osal_init_system();
/* Enable interrupts */
HAL_ENABLE_INTERRUPTS();
osal_set_event( App_TaskID, SBP_I2C_INIT_EVT ); /*初始化I2C和9930的任务*/
/* Start OSAL */
osal_start_system(); // No Return from here
}
最后一句启动了OSAL后,由系统托管了应用程序,再也不会在main中编写代码了。Bye Bye, main! ^-^
用户任务代码都放在app.c文件中,新建该文件,示例用法概要如下:
/*********************************************************************
* @fn App_Init
*/
void App_Init( uint8 task_id )
{
App_TaskID = task_id;
/*用户新增功能初始化*/
UserAppInit();
// Setup a delayed profile startup
osal_set_event( App_TaskID, SBP_START_DEVICE_EVT );
}
/*********************************************************************
* @fn App_ProcessEvent
*
* @brief Simple BLE Peripheral Application Task event processor. This function
* is called to p
『本文转载自网络,版权归原作者所有,如有侵权请联系删除』


 热门文章
更多
热门文章
更多

 洪荒之力+无比专注=国内首款机器人离线编程软件


 APP下载
APP下载 登录
登录


