×
单片机 > 单片机程序设计 > 详情

STM32 控制4位共阳数码管输出计数

发布时间:2020-09-02 发布时间:
|

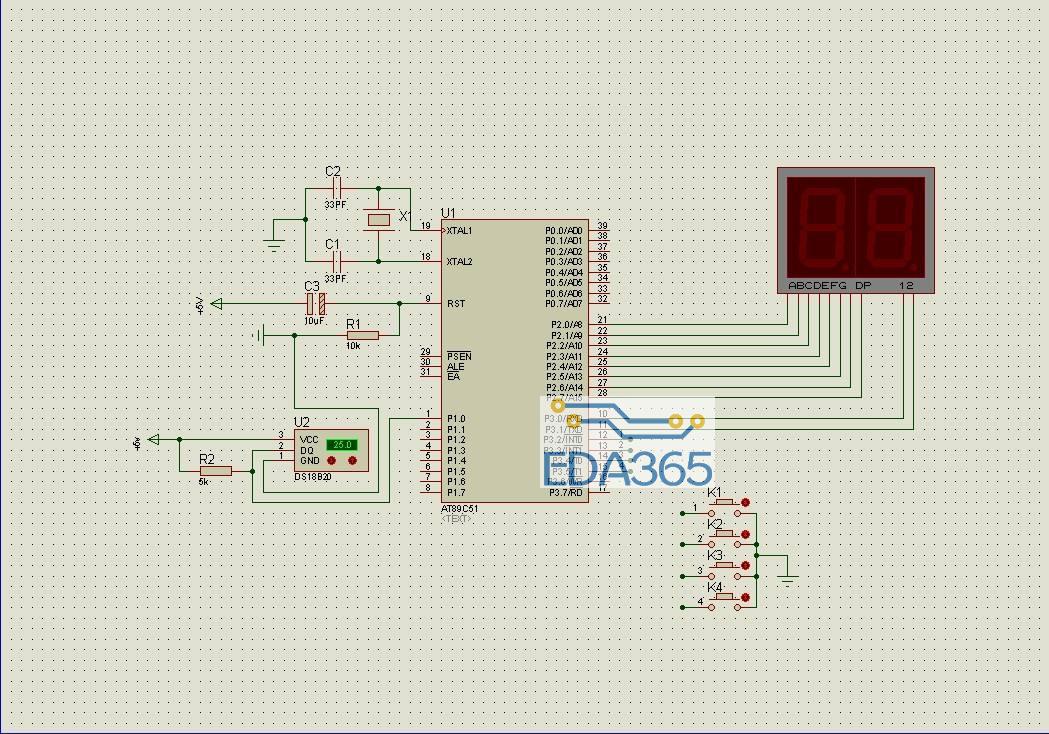
用到GPIO口 PA0~PA11共12个引脚

先上原理图

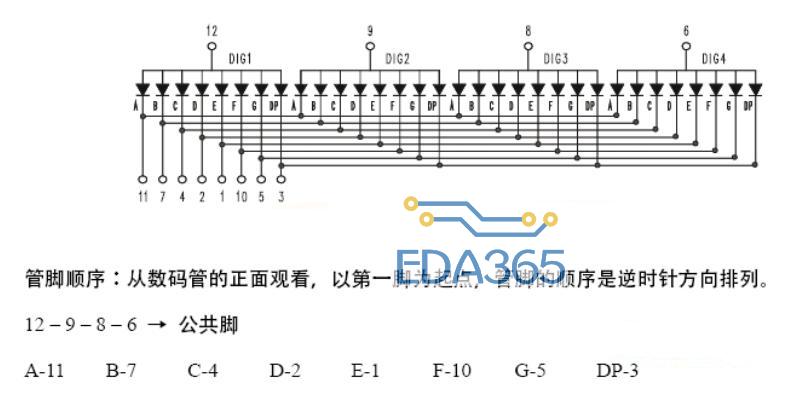
因为是共阳所以12,9,8,6为电源输入,其他引脚均为接地,所以对于芯片来说12,9,8,6高位输出,其他设定为低位即可。


  1. //设定下GPIO口  

  2. void GPIO_Num_Init(void)  

  3. {  

  4.     GPIO_InitTypeDef GPIO_InitStructure;  

  5.     RCC_APB2PeriphClockCmd(RCC_APB2Periph_GPIOA,ENABLE);  

  6.     GPIO_PinRemapConfig(GPIO_Remap_SWJ_Disable, ENABLE);  

  7.   GPIO_InitStructure.GPIO_Pin = GPIO_Pin_All;  

  8.     GPIO_InitStructure.GPIO_Mode = GPIO_Mode_Out_PP;   

  9.     GPIO_InitStructure.GPIO_Speed = GPIO_Speed_50MHz;  

  10.     GPIO_Init(GPIOA,&GPIO_InitStructure);  

  11. }  


这里有个要注意的,根据原理图可以看出数码管一次只能输出一位数组,所以如果是多位的必须使用扫描的方式输出,缩短切换的间隔,就可以达到不闪烁的效果。


  1. //输出封装  

  2. void DisPlayNum(int n)  

  3. {  

  4.     if (n 

  5.     { int i;  

  6.         int s;    

  7.         s = n;  

  8.         i=0;  

  9.         for (i=0;i<4;i++)  

  10.         {  

  11.             GPIO_ResetBits(GPIOA,GPIO_Pin_All);  

  12.             switch (i)  

  13.             {  

  14.                                 case 0:  

  15.                     GPIO_SetBits(GPIOA,GPIO_Pin_5);  

  16.                     break;  

  17.                 case 1:  

  18.                     GPIO_SetBits(GPIOA,GPIO_Pin_7);  

  19.                     break;  

  20.                 case 2:  

  21.                     GPIO_SetBits(GPIOA,GPIO_Pin_8);  

  22.                     break;  

  23.                 case 3:  

  24.                     GPIO_SetBits(GPIOA,GPIO_Pin_11);  

  25.                     break;  

  26.                         }  

  27.           

  28.             switch (s % 10)  

  29.             {  

  30.                 case 0:  

  31.                     GPIO_SetBits(GPIOA,GPIO_Pin_2|GPIO_Pin_4);   

  32.                     break;  

  33.                 case 1:  

  34.                     GPIO_SetBits(GPIOA,GPIO_Pin_2|GPIO_Pin_0|GPIO_Pin_1|GPIO_Pin_4|GPIO_Pin_9|GPIO_Pin_10);  

  35.                     break;  

  36.                 case 2:  

  37.                     GPIO_SetBits(GPIOA,GPIO_Pin_2|GPIO_Pin_3|GPIO_Pin_9);  

  38.                     break;  

  39.                 case 3:  

  40.                     GPIO_SetBits(GPIOA,GPIO_Pin_2|GPIO_Pin_0|GPIO_Pin_9);  

  41.                     break;  

  42.                 case 4:  

  43.                     GPIO_SetBits(GPIOA,GPIO_Pin_2|GPIO_Pin_0|GPIO_Pin_1|GPIO_Pin_10);  

  44.                     break;  

  45.                 case 5:  

  46.                     GPIO_SetBits(GPIOA,GPIO_Pin_2|GPIO_Pin_0|GPIO_Pin_6);  

  47.                     break;  

  48.                 case 6:  

  49.                     GPIO_SetBits(GPIOA,GPIO_Pin_2|GPIO_Pin_6);  

  50.                     break;  

  51.                 case 7:  

  52.                     GPIO_SetBits(GPIOA,GPIO_Pin_2|GPIO_Pin_0|GPIO_Pin_1|GPIO_Pin_4|GPIO_Pin_9);  

  53.                     break;  

  54.                 case 8:  

  55.                     GPIO_SetBits(GPIOA,GPIO_Pin_2);  

  56.                     break;  

  57.                 case 9:  

  58.                     GPIO_SetBits(GPIOA,GPIO_Pin_2|GPIO_Pin_0);  

  59.                     break;  

  60.             }     

  61.             s = s / 10;  

  62.             delay_ms(1);  

  63.             if (s==0)  

  64.                 break;  

  65.         }      

  66.     }  

  67. }  


最后main的测试代码


  1. int count;  

  2. int TimeCheck;  

  3.   

  4. int main(void)  

  5. {  

  6.     GPIO_Num_Init();  

  7.     count =0;  

  8.     TimeCheck = 0;  

  9.     while(1)  

  10.     {  

  11.         DisPlayNum(count);  

  12.         TimeCheck++;  

  13.         delay_ms(5);  

  14.         if (TimeCheck > 100){ //每500毫秒+1  

  15.             TimeCheck=0;  

  16.             count++;  

  17.         }  

  18.     }  

  19. }  


关键字:STM32  共阳数码管  输出计数 

『本文转载自网络,版权归原作者所有,如有侵权请联系删除』

热门文章 更多
单片机制作超级流水灯